Tuesday 30 April 2013

Handmade design quest continues

Still plugging away at coming up with design for my company logo, business cards etc.  It's a hard job and I'm definitely not qualified to come up with something stylish and professional. But as I've 0 funds at all to pay anyone for it, I'll keep chipping at it and hopefully come up with an acceptable start.

I think I've got the direction I want my logo to go in, after much deliberation.  It needs more work to really make it stand out, maybe a hand-drawn welsh dragon? Anyway it's a start.


I've also been working on a business card, another thing I can't pay anybody for, unless I can find a free offer somewhere...though those always seem to be hiding shipping charges!  Since I've an idea for a logo, that makes the card so much easier!  Not sure how the reverse of the card will look, but the front is going in this direction:


Obviously more work is definitely required!


Monday 29 April 2013

While I'm waiting, more scented soy candles!

I decided while I was waiting for my paraffin wax to arrive, to have another go with making some soy votive container candles & experiment with another scent - Patchouli Nutmeg & Ginger from Scent Perfique.

I followed my usual technique I'd adjusted to recently, heating to 80C, adding scent & 70 and then pouring at 65.  This time I didn't use any color dye as I couldn't decide what would be a suitable color for this fragrance...and thought perhaps a classic uncolored candle would suit the scent very well.  I think I chose correctly but we'll see how it goes.

I've got 2 different wicks in these, one is CSN -16 from 4candles, the other is TB-14 from Candleshack.

Lots more still to come, watch this space!

Due for another luminary update!

OK so here it is, another update on my luminary journey.  I've done 3 lots of luminaries since I finished the last batch.  My MIL has received her 12 luminaries that she asked for as gifts, and I've also finished making the ones for others who requested them. Making a grand total of 16!

These are the neutral cream ones I made, matching tealights of a similar color, scented with Apple Strudel & spice.  I think these were my favorite :)

The controversial purple/pink color! Many seemed to like it with the minority (including myself) not caring for the color.  Matching tealights scented with Black Pomegranate - I think I've decided that I don't care for the scent so won't be using it again.

And the final lot, also a bit controversial in it's way. Many seemed to prefer the flowers to be more prominent where others were happier with them blending in like they do here.  But I really love the deep red color I got with these, and the matching Wild Berry tealights (2 were actually Orange & Cinnamon as requested).


I've no more requests for these so I've ordered more paraffin wax and I'm now going to be experimenting with my new hurricane mold. These will be so much more customisable and I think they'll do very well. I can't wait to share my experiences with these!

Thursday 18 April 2013

Luminary journey of learning continues

All right, overdue for a bit of an update.  I've done 2 lots of luminaries since I did the last update, and overall I've been pretty pleased with them.  My current dilemma is that my 15cm porridger pot just isn't wide enough for the size and thickness of the luminaries that I want to do, so I kept getting lumpy sides where I touched the sides of the pot with the balloon. Frustrating!  These are the photos from the first lot since the last update, I adore their sunshine-like color, not thrilled about my attempt to embed this time though as I placed it too low on the luminary itself.  Otherwise I think they don't look too bad aside from that lumpy texture I was talking about.

This is a photo of the two of them cooling and setting on the balloons.


So for my 2nd lot of luminaries I decided to have a go at making smaller ones, thus avoiding the sides of the pot.  Problem is I will now have to test these to see if they're TOO small and thus unsafe to use.  They however are very lovely and have a nice smooth finish to them...other than the one with the forget-me-not flowers on the far right as I didn't dip the final coat fast enough and got too thick of a layer of wax over the flowers, and I also got too low on the amount of wax I had for dipping - annoying!  I will definitely have to invest in a deeper pot.  But the other two I'm very pleased with!

Here they are setting and cooling


 Final product

My deep pot should be showing up in the next day or two so watch this space and see how I get on with it.

***edited to add***

Photos of one lit :)


Saturday 13 April 2013

Continuing on from yesterday's adventures

I really enjoyed making those luminaries yesterday, I was so pleased how they looked and at the response that I received from those who'd seen them.  I was really looking forward to lighting them up and seeing how they glowed.  But I was ultimately horribly disappointed as when I lit them up they revealed the horror inside, tons of air bubbles in the wax, yikes!!!


So disappointing.  So today I decided to have another go at making them, but this time adding PE22 to the mix and seeing if giving the wax a bit more rigidity would solve my problems and keep those air pockets from forming.

Dealing with PE22 is a tricky business, and I was very nervous about using it for the first time.  Main reason being that my double boiler set-up cannot get this additive hot enough to melt down, so I have to set it on direct heat - scary.  Here's the advice I received from a knowledgeable chandler on the Craft Forum (you know who you are! thanks ! ).  Please take GREAT care in using this additive! I used about 2% for my mixture.

"It needs to get to just a little higher than your wax can get in a double boiler setup (I.e. just over 100c).

Add it to a smallish amount of your paraffin (about. 150 to 200ml and heat over a direct heat. Three things are very important whilst you're doing this.

1) Don't add any dye to the wax before or during this stage. The heat will get so high it will cause the dye to discolour. And also you don't want anything to hinder your view of the PE22 beads as you'll be wanting to get that wax off the direct heat the very second the beads have melted.

2) Don't have anything else on the go at the same time. Heating wax on a direct heat can be dangerous as it can very quickly reach its flashpoint so the last thing you need is a distraction mid way through melting your PE22.
3) Stir the wax continuously until the PE22 has fully melted. This will stop you being distracted by other things! "

I managed to get through this process without fumbling it, but boy I panicked seeing that temperature getting so high! Managed to get it under control and added the mixture to the rest of my wax. Then proceeded to follow my method that I wrote here.

I think I've come to the conclusion I need a bigger pot for these, or I'm also toying with the idea of making these similar to a hurricane mold and getting a suitable bowl of the right size and shape as my dipping abilities still need a lot of work lol  


Sadly no embeds this time round, I'm out of the few dried & pressed flowers I had, so just plain green from the leftover wax I had from the previous batch of luminaries.

More to come, watch this space!

Friday 12 April 2013

More luminaries

As I'm still waiting for my proper hurricane mold to arrive from Manzanas (they're still not shipping out until the 17th), I decided to have another go at the luminaries I did a while back.

This time I decided to use a bit of color, and in preparation for doing luminaries again I'd been pressing/drying a few flowers to embed into the luminaries, though choices are limited at the moment. Ready for spring!!!!

One small difference in my method this time around is I upped the temp of the wax to around 75 C and kept it there, my electric hob didn't make that very easy at all.  I'm not sure if 75 was too hot or not but did seem to be working rather than stripping the wax off each time.  Other than that, up to embedding the flowers, I stuck to my previous method, which can be found by clicking here.

Once I'd gotten them to a reasonable thickness, on the last dip before setting them down, I placed the flowers VERY QUICKLY onto the luminary. If you aren't fast enough it will harden before you can.  I'm going to experiment on using a heat gun when this happens to soften a spot and embed them this way as you can't really place them very carefully this way.  Anyway, after placing them on the luminary I dipped them one more time to seal them in and then set them down to cool.

Here they are cooling on my wax paper.


After they'd cooled I burst the water balloons with a pin and then flattened the tops using a hot pan covered in tin foil.

And that's it, not much else to it. More refinement needed as the flowers aren't quite what I had in mind, and I do think they need to be thicker. But aside from that I think we're getting there, watch this space!

Tuesday 9 April 2013

More labelling ideas

I feel like I'm really getting close to coming up with a good label for my jar candles, still needs more tweaking but I'm far happier with this than I've been with any of my other attempts. I haven't settled on any particular scents yet, these are just taken from some of the scents I have at the moment.


And an idea of what it might look like on the jar I've taken a liking to. It's not "quite" there yet as the text isn't exactly how I want it yet, but not sure what I'm after yet.

**edited to add**

Updated label. Things I tweaked include: I unified and increased the size of the company name, I increased the size and unified the FO name, I increased the size of the photo at the bottom, I darkened the dragon watermark at the back, and I've put a thin two tone border of red and green around the outside of the label.


Latest creation

I had a bit of inspiration strike me yesterday while I was in town for a regular dentist appointment.  I'd hopped over to Wilkinsons after the appointment and was browsing the cooking department and found some jam/chutney/pickling jars on the shelf.  Immediately had my eye drawn to a little classic Kilner jar, not exactly round but not square either, but just the right size of candle jar I was looking for.  I really didn't want to look at larger jars due to the complications with wicking such large soy wax jars.

Anyway I took it home and immediately set to making a candle out of it, using one of the many new wicks that I bought from CandleShack (No, not the US company but a scottish based company.) In this instance I used their  CL 14 wick, I was immediately impressed by the rigidity of the wick so I have high hopes.

I used 155g of soy XL wax and 15g of Scent Perfique's Mandarin, Grapefruit & Lime scent. I also used my altered temp set of 80/78/65 to pour into this preheated jar and got the opportunity to  use my new glue gun to stick the sustainer of the wick to the bottom of the jar, it worked great!  I also used some old fabric I had lying around to wrap snug around the jar to keep it nice and toasty in addition to using a bowl over the top & the towels...perhaps I went a bit overboard really, but our kitchen is still quite chilly and I didn't want this to set too quickly.

It looks a bit goofy but it really did seem to work

I feel like I really got the color right this time round, using a blend of red and orange soy dye chips

Final product, it smells so good! Can't wait to test it out.

I'll have to let this cure for about 5 days before I'll think about testing it, but I hope it goes well.


Thursday 4 April 2013

Water Balloon Luminaries

I finally received my water balloons today so I got the chance to attempt water balloon luminaries for the first time.

It was a bit of a first in many ways as I've not worked with paraffin wax before so spent some time coming to grips with it.  First I had to figure out how to break off what I needed from one of the 2.5kg slabs of wax that I have ( I ended up bagging it and dropping it from shoulder height to the patio stones outside, as a knife just wasn't working for me. Lacked finesse but did get results!), then had to get to grips with melting it which took far longer than I'm used to with soy wax.

Having that all under control I got my wax stabilised at around 75C and got to dipping!  Things to keep in mind for these...

1) Use a high melt temp wax, I'm using Candleshack 360S for these.

2) fill the water balloons with warm water, and don't overfill them.

3) I recommend using the water balloons rather than regular balloons as they seem more robust.

4) I kept my water balloons in a warm bowl of water to keep them at temp while I fiddled with the wax, make sure to dry them off before dipping however - water and wax don't mix!

5) have wax paper laid down in advance to place the balloons on.

*
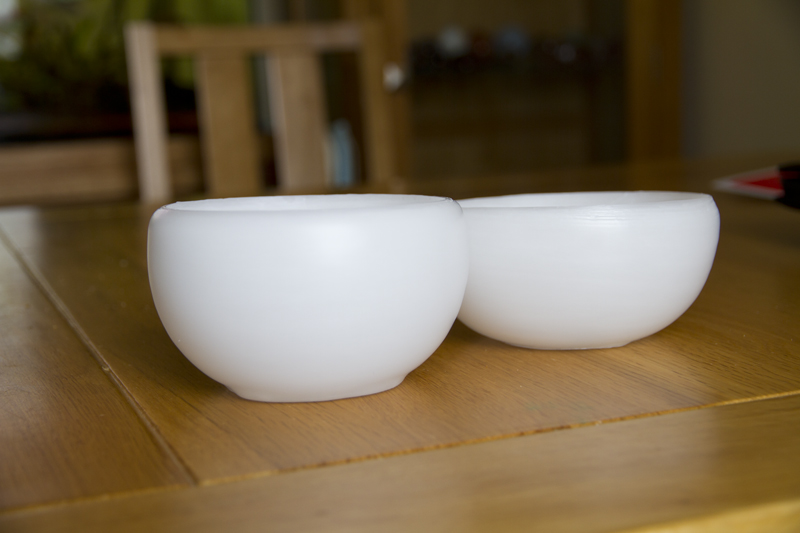
Back to my luminaries.  My process was to dip the balloon in the wax for a few seconds and take it out and held it while it dried a bit, then dipped it back in again for a few seconds.  I did this 5 times, then placed it on the wax paper. **note** the way you place the balloon on the paper is the shape it's going to set in, so take care how you place it. **  After the luminaries cooled some, I dipped them again in the wax 5 times and set back to cool.  I kept doing this until I got a reasonable thickness to the walls.

Conclusions:  I think next time I'll want to add a color, as although these white ones are nice I think they'd benefit from a bit of vibrancy.  I also wonder if these would take to having pressed flowers embedded into them? Something to test!  I also think I'll want to get a larger pot for dipping as my porridger pot is a tiny bit snug for these.


***edited to add***

Wanted to show just how good it looks all lit up, I love it !


Wednesday 3 April 2013

Admiring my work

Just a little "pat on the back" for myself, I think these look great!


I should be able to test some of these soon, but in the meantime I'll just admire them!  Hopefully the new wicks I ordered from Candle Shack's website will show up soon as they'd be ideal to use on these green votives.

New equipment & another candle

Starting to have some of my orders for supplies trickle in now, with my paraffin wax & PE22 showing up, along with my hot glue gun (minus glue, still waiting for that) and my porridger to use as a double boiler.

My porridger, really works great!

As my pans showed up today I thought I'd give it another go at getting my red dye chips to dissolve properly.  I've been assured that I can take my soy candle wax up to 90C without adverse affects as long as I don't keep it there very long.  Here's the process I followed:

I put my wax in the top pan of my double boiler and heated that up as normal. I've never used a metal pot to heat up wax so watched in shock as it heated up so fast!  I placed my red dye chips in around 80-85C, and to my amazement melted in straightaway!  My revelation of the day: don't use my pyrex jug with red dye chips as the metal works great!  Anyway once the wax reached 90C, I poured my wax straight into my preheated pyrex jug to cool down the wax from 90 pretty quickly.  Once the temp reached 78 or so I added fragrance and stirred on and off for a minute or two.  Once the wax reached 65 I poured into my preheated glass.

Overall it seemed to work great, the candle is nearly as red as I'd like (still a bit pink) and smells amazing with the Wild Berry scent from Sensory Perfection.

cooling - I placed this immediately after the photo under a plastic mixing bowl and covered it with towels to allow it to cool slowly.

final result, not quite red enough but headed in the right direction, and best of all, no red bits floating in the wax, success!


Tuesday 2 April 2013

More labelling ideas...

Still brainstorming ideas, labelling and logos are giving me a headache!

I'm trying hard to get this logo/labelling to represent the fact that these are a) candles that I'm making and b) that they're being made in Wales.  Tricky sort of combination to get right, I don't think I've struck on the exact right thing just yet...


My idea thus far for a logo, it's still not quite right.

More labelling ideas for the candles themselves.

If anyone has any feedback feel free to post here.  More brainstorming needed!

edited to add:  Another variation of the first image...still working on it:


Monday 1 April 2013

2 different candles on the same day!

Yep, a continuation of the post from earlier today.  I decided to have a go at a slightly different method to creating this particular candle.  I decided to reduce my melting temp to 80, added fragrance at 78, and then poured at 65 into a heated container.  I used red dye chips and Sensory Perfection's Wild Berry scent.

I'm really unhappy with this red dye that I got from 4candles, it just WILL NOT melt entirely into the wax, it keeps leaving little red particles of dust throughout the wax. and no matter what I do, they just will not dissolve into the wax.  Very frustrating, I may have to source red dye elsewhere, as otherwise I've been very happy with the dyes from 4candles.  So I've ended up with a rather Barbie pink candle which is seriously grossing me out lol

However I'm extremely happy with the cold scent throw from the Wild Berry scent from this particular candle, I can smell it at distance, which is very nice.

final product, uggh the pink...hopefully the hot throw will make up for it

watch this space!

Yes, more candles!

First in the news, I've ordered some more supplies.  In addition to doing my scented soy candles, my main intention is to do hurricane candle shells.  I think these will be so customisable and can be unique to each person ordering one.  So I've ordered the hurricane mold from Manzanas website, but won't be receiving it for a few weeks as they're not shipping out until the 17th due to a long easter break. I've also ordered from 4candles their 5kg slab of Candleshack 360S Paraffin Wax & PE-22 additive to strengthen the wax, and  CSN 12 wick to try .  In addition to all that I've ordered an Infrared no-contact thermometer to try, a hot glue gun to stick my sustainers to the bottom of the containers, a double-boiler setup, and some water balloons to make some wax luminaries - fun!

Here's an example of Hurricane Candles , and here are Water Balloon Luminaries

My main next purchases will be to try out some wicks from Candle Shack's website as I'm not 100% happy with the wicks I'm getting from 4candles, and to try out some scents from Scent Perfique and from Candle Shack.  I also need to find a large bucket and some mold weights to use for a water bath for my hurricane mold.

Ok back to candles!

After having a week off on holiday, the day has finally arrived for me to be able to get back to some candlemaking, hurray!

These two came out really well, I was so pleased to see these did not split and crack like the last two pink ones that I had made so I get to put those pink ones as a one-off.  I used orange color dye with these two, and Orange & cinnamon scent from Sensory Perfection.  I did my usual 84/82/65 routine in making these candles, however I broke from routine a bit by covering these two with a large plastic mixing bowl and wrapping that in towels, to allow the containers to cool slowly.  The texture on these just is so creamy smooth as a result and they smell amazing - I have to hope that the smell remains for the hot throw which I'll test in a few days time.

My first (and only) pour, hardly sunk at all so I really didn't need a 2nd pour.

Final results, with a bit of embellishing.

more to come, I hope to get to try my luminaries very soon!