Wednesday 20 March 2013

More testing

This time with some container votives that I made last weekend.

These ones were quite a pain to make in the end, as although they seemed to pour very well and did everything as I normally did, they had some horrible cracking and wet spots all over - completely unlike the green container votives I did previously.  I can only presume that it's down to the different scents, but more testing will be required and will have to do this setup again.

To try and solve it I remelted the top using a heat gun and tried to get some of the air bubbles trapped in it that were causing the cracks, but never did solve the wetspots on the sides, heating the sides of the container did melt the wax, but it did not reharden in a smooth fashion so gave it up for lost this time.

I made two of these container votives, using 145g of soy XL wax, minute amounts of red dye to create this baby pink shade (far less than half a gram), and 8% or 10g of Water Lily scent from Sensory Perfection that I got for free with my order.  Usual setup of heating to 84C, scent added at 82C, and pouring at 65C into heated containers, wicking one with CSN 14 and one with CSN 16 to see which burns best.

I'm completely thrilled with the strength of the cold scent from these candles, and so far the hot throw from these is really excellent, filling the small room that it's being tested in, despite the door being wide open.  So needless to say I'll be reordering this waterlily scent to test again and see if I can't solve the cracking & wet spots mystery.

Created my wick holders from ice cream lolly sticks, measuring the exact middle of the stick and drilling small holes into them. Seem to work really well, though need to work harder on getting those sustainers to stick properly. I'll be ordering a glue gun & hot glue soon.

Test burning, don't mind the towel, it's further away than it looks, and it's keeping the draft from the window from blowing the flame around.


Monday 18 March 2013

Some more votives

These were a bit of a challenge this time around, suppose it's good for me to have candles do this every now and again, so I can examine what went wrong.

I did everything as I normally do, heated the wax to 84C, cooled to 82 before adding Apple Blossom scent from Sensory Perfection, then pouring at 65C into heated votive molds.

As things cooled, that's where things started to go wrong.  I got cracking all over the tops of both my votives, it looked awful!  I thought well I'll put on a 2nd pour like I normally do for my votives and see if that sorts it out.  But no, they cracked through that as well.  So I took the heat gun to them and that finally seems to have sorted them out for the most part.

Only one thing I did differently this time was not grease the molds, thinking they'd had enough use that I shouldn't have to at this point.  I was wrong wrong wrong!  These little buggers were super hard to get out of their molds, I had to pop them into the freezer for a bit before I could slide them out, risking yet more cracking.  Thankfully they did not crack further and the repair work I'd done managed to last.

1st pour

2nd pour


Final product:  some ideas for how I might present them.  I'm so much happier with the color of these compared to the other 2 green types I've done.


Friday 15 March 2013

Conundrum of Labelling

Been taking on the challenge of trying to brainstorm on whether labelling was going to be something I'd want to pay someone to design for me, or to take on the massive challenge of designing my own logo and labels.

I'm pretty handy with photoshop and taking photos in general, so I decided to take a bit of a plunge and try to make my own labelling.  If anyone out there is reading this and can comment, Please do comment and let me know how you think they look?


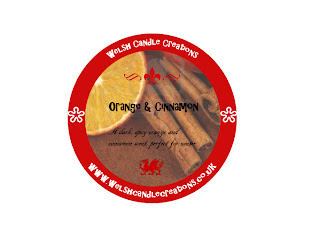
This first one I'm thinking would be a great company label or tag that I could string onto my jar candles in addition to a scent label.  I may also consider commissioning someone to create a custom stamp for me using this model, I'd love to be able to stamp this rather than print!

And this is what I'm thinking will be my scent labels for the main jars, I've "borrowed" an image of orange and cinnamon until I can get some materials together to take my own photos.

More brainstorming needed, watch this space!

Thursday 14 March 2013

Testing "Lifestyle Photography"

Since I'm still down with a cold and can't smell anything at the moment, I'm back in research mode until I'm able to test the hot throw on my most recent candles.

Having done some research into some websites where I might sell my candles, I noticed that there seemed to be a requirement on all of them to present your products using "lifestyle photography", in other words, presenting your candles in a "real life" situation in a controlled setting.  In simple terms, dressing up your product other than just taking a quick snap of it with no effort taken at all.

Having never tried this sort of photography, preferring wildlife photography really, I decided to have a go at setting up a little scene with the candles I'm waiting to test, and some bits and pieces I had around the house.  I used the natural morning light coming from the back patio doors, some white paper, a red pillar candle I was gifted with some time ago, a plant basket that I've a hyacinth growing in at the moment, and some flowers from a bouquet I had in a vase.


I think I like this one above and the one below the best of the lot


Tuesday 12 March 2013

Testing time!

And we're off!  Testing my first set of votives with my very own supplies, nice narrow votive holders, and the 4 types of wick that I've bought for this time round.

I'm testing 4 of the 6 soy votives that I made a few days back, using CSN 14 & 16, LX-14, and ECO-6 wicks. I'm not really testing for hot throw yet simply because I can't SMELL anything at the moment, but my husband could smell it when he came in which tells me that there is a hot scent throw coming off them.


And we're off!


All the initial melt pools a little off center for some reason, I used wick pins for all these votives so not sure why they're melting off center.  Initially I'm favoring the LX-14 by looks alone.

Alternate view

In this photo, so far the LX-14 is the only one who hasn't leaked wax down the sides of the holders and filled the container, so still favoring this one.
 This view also shows the LX-14 being a slower burner without having a weak flame.

So my conclusion at this point is I've basically ruled out the CSN-16 as it was just too aggressive from the start.  However for the other three there's not much in it.  All three had a pretty steady flame, not too large or small, and none drowned in the wax.  These three also seem to burn at the same rate with not much between them.  So more testing needed using these 3 wicks, and this time I'll be testing their hot scent throw in addition to how they burn.

 Watch this space!

Sunday 10 March 2013

Now that I've gotten started...

Why not start a few more?  I got a bit of bonus time today so decided to have a go at votive-sized container candles as I felt the ECO6 wicks I bought would be a good size for these.  If not I'll try one of the others I've got.  Anyway, the whole process went better than yesterday I think.  The color still isn't quite what I was aiming for, a lighter shade of green would've been nice, but the scent is so much better than the last batch.

So this time round I've got 2 votive holders which I'm using as containers, about 137g of wax, 12g of Dewberry from Scent Perfique, and less than .5g of green soy color.  I followed the same process as yesterday for heating, scenting and cooling, except I added the color chips after the initial wax had melted, to better gauge how much color I needed.  I also stirred in the scent for 4 minutes rather than 2, and this seemed to help it bind better...or it's just coincidence, I'll have to test that theory some more.


I had to get creative in holding the wicks upright as I thought my clothes pins would do the trick but they're simply not long enough to bridge the width of the containers, so moved to this rather unorthadox setup.  I'll create something a bit more standard for the next time.


Overall I'm pleased with the first pour, I didn't really feel the need for a second as it seems level and smooth all across the top.  No sign of wet marks or mottling on the sides, so fingers crossed these turn out well.

I'll let these ones cure for about a week before testing.  Watch this space!

x

Saturday 9 March 2013

Finally the day has come!

Thanks to a really great lady on craftsforum (you know who you are, thanks!) I was able to FINALLY melt some wax and get some candles curing to test in a few days.

My planned settings were to make 3 votives using Summer Meadow scent from Scent Perfique, 375g of wax, and 4g of Green color chips.

Process was I heated up the wax & color chips to 84C, cooled to 82C and then added scent.  I stirred in the scent for a few minutes then left to cool to 65C, then poured into heated molds.


Things did NOT go to plan however, because some time into the melting process I realized that I'd melted enough wax for 6 votives, not 3 as I intended...oops! My math skills yet again equal an EPIC fail.  So I got far more candles than I intended.  Upside is I got to put all 4 types of wick I bought into the votives to test all at once, I'm putting 1 wick each of CSN 14 & 16, LX 14, and ECO 6 to test this time round.


I also made it far darker than I intended.  So next time I'll underestimate what I need and go from there.  Disadvantage of them being so dark is I can see some frosting on the wax which is a tad bit annoying.  Also, so far the cold throw is pretty underwhelming so I'm not really expecting very much from this batch.

Friday 8 March 2013

Still waiting....

Still waiting!!  Although I ordered all my supplies a week ago, I'm still waiting for Sensory Perfection to send me their scents, although after shooting an email off to them I now know they're going to be sent for dispatch today, hurray!  In the meantime, I've had a really great lady on the craftsforum website offer to send me a scent she did not intend to use more of (you know who you are, thanks!!!) and although it's NOT one of my favored flavors, at least it's something I can work with to start with.

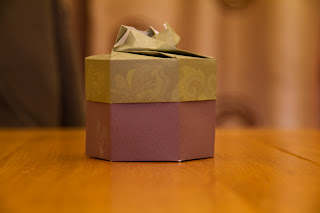
So as I've no candles to melt, I've decided to start researching packaging and perhaps things I could make on my own that would make attractive little gift boxes to place purchases in for customers, either to use at craft shows or to ship to customers.  Found a great little video on YouTube about Origami Hexagonal gift boxes and decided to give it a go, the link for it found here:.  As you can see from the picture, the lovely little knotwork on the top did NOT work, but overall aside from that it seems to have come out all right.  I'll need to practice the folds some more, and maybe increase the size slightly, but other than that it's not a bad effort on my part I think.


Monday 4 March 2013

New supplies

My very own set of supplies is here!  Thank you 4Candles for your quick delivery and their email service is super.  I used DPD to have my stuff delivered and they sent me an email letting me know the hour in which they expected to deliver my package today - and they actually delivered it in that time!

Unfortunately I still have to wait for scent so I'll be unable to melt any more candles until next week probably. But I'm SO excited to finally be moving a bit further forward.  Watch this space!


So with this delivery I've got 5kg of Soy wax CB-Xcel, 4 more votive molds with pins, a variety of recommended wicks to try for votive candles (ECO 6, CSN14 & 16, and LX14), sustainers for the wicks, 3 different colors made specifically for soy wax, and some tea light wicks (ECO .5) to use as well. Overall very pleased, wish I could start melting TODAY! :)

Friday 1 March 2013

Second try

So decided to use the last of my wax today and make the final 2 candles from the starter pack that I got.  Times perfectly with me finally being able to order my own supplies and to give it a go all on my own, I'm Very excited!

Ok anyway this particular pair was made again with soy wax, with orange color, and orange scent.  I used all the color chips I had this time rather than just using part of it, and I have to say the color is much more true to what I had in mind compared to the previous two.  The scent however is a smidge underwhelming at the moment, we'll see how it smells after a few days.

Here's a photo after my 2nd pour of this one.  

And here's the final product, such as it is.  I don't think I got the original pour and the 2nd pour to "meld" together quite as well as the first two, that's a bit annoying. But overall I'm still pretty happy with the results.

And there we have it! Not as photo intensive this time round, I expect I'll have tons more to talk about once I get my hands on more supplies!